I Replaced My iPhone Battery at Home. Here’s How to Replace Your iPhone Battery in 5 Simple Steps
It was a typical Saturday afternoon. I was getting ready to head out, but my iPhone was barely holding a charge. As usual, I had been on it all morning—checking emails, replying to messages, scrolling through social media, and catching up on the latest news. By the time I was ready to leave, the battery was down to just 15%. Frustrated, I plugged it in, hoping to get just a little more juice. But the truth hit me—my phone’s battery had seen better days.
Like many of us, I rely on my iPhone for almost everything: staying connected, navigating to new places, and even managing my work. The idea of being without it for a day to visit an Apple store for a battery replacement felt inconvenient, not to mention expensive. But what if I could fix the problem myself? What if I didn’t have to pay a premium for something I could do at home?
That’s when I decided to take the plunge and replace my iPhone battery on my own. And let me tell you—it wasn’t as difficult as I thought, and it saved me a substantial amount of money!
Have you ever wondered if you could replace your iPhone battery without having to take it to a repair center? Well, the good news is, you absolutely can. Replacing the battery in your iPhone at home isn’t just an option—it’s a great way to save money and breathe new life into your device.
In today’s world, iPhones are not just devices for making calls—they are our lifelines. From keeping in touch with loved ones, managing daily tasks, to accessing the world through apps, we depend on them every single day. But over time, like all lithium-ion batteries, iPhone batteries start to degrade. This degradation results in shorter battery life, slower performance, and a phone that isn’t as reliable as it used to be.
We’ve all been there: you’re out and about, checking your phone, only to watch that dreaded low battery warning pop up. As the battery drains faster and faster, you’re stuck trying to find an outlet or carrying around a charger everywhere you go. It can be incredibly frustrating when your device doesn’t live up to its potential.
Here’s the kicker: many people resort to visiting an Apple store or a third-party repair shop when their iPhone battery starts to die. While this is often seen as the easy route, it also comes with a hefty price tag. Depending on your model, you could be looking at anywhere from ₦30,000 to ₦60,000 or more for a battery replacement.
But what if I told you there’s another option? Replacing the battery yourself at home not only saves you that expensive trip to the repair center, but it also gives you the satisfaction of reviving your device without the need for professional help. With the right tools, a bit of patience, and following a few simple steps, you can replace your iPhone battery yourself, breathe new life into your device, and save some money in the process.
Now, you might be thinking, “But I don’t know anything about phone repairs!” That’s exactly what I thought when I started. However, with the help of a few online tutorials and the right instructions, I found that it was easier than I had imagined. So, why not give it a try? Let’s walk through everything you need to know about replacing your iPhone battery at home—step by step.
What You Need to Know Before Replacing Your iPhone Battery
Before diving into the replacement process, it’s crucial to understand a few things. Replacing your iPhone battery is not a task to be taken lightly, and you need to ensure you’re fully prepared before you begin. In this section, we’ll cover why your iPhone’s battery might need replacing and how to spot signs that it’s time for a change.
Why You Might Need a New iPhone Battery
iPhones are designed to last, but after a few years of usage, the battery naturally starts to lose its ability to hold a charge. Here are some common reasons why you might need a new battery:
-
Battery wear and tear: Over time, the battery’s ability to charge fully diminishes.
-
Battery swelling: Swollen batteries can cause the screen to bulge and even make the phone unsafe to use.
-
Battery overheating: A battery that overheats may cause the phone to shut down or lose its charge quickly.
Signs That Indicate It’s Time to Replace Your iPhone Battery
Here are some clear signs that your battery might need replacing:
-
Your iPhone shuts off unexpectedly or doesn’t hold a charge for as long as it used to.
-
Sluggish performance: If your phone slows down dramatically during normal use.
-
Battery draining rapidly: If your battery drains faster than usual, it may be time for a replacement.
Battery Health on iPhones: How to Check
You can easily check the health of your iPhone’s battery by going into Settings > Battery > Battery Health. This will show you the maximum capacity of your battery. If it’s under 80%, it’s a clear indicator that your battery is due for a change.
Common Myths About iPhone Battery Life
There’s a lot of misinformation out there about iPhone batteries. Let’s debunk some of the common myths:
-
Myth 1: You have to replace your iPhone battery every year: Not true. As long as your battery is functioning well, there’s no need to replace it.
-
Myth 2: Charging your iPhone overnight ruins the battery: In fact, iPhones are smart enough to manage charging cycles, so overnight charging is generally safe.
Gathering the Right Tools for the Job
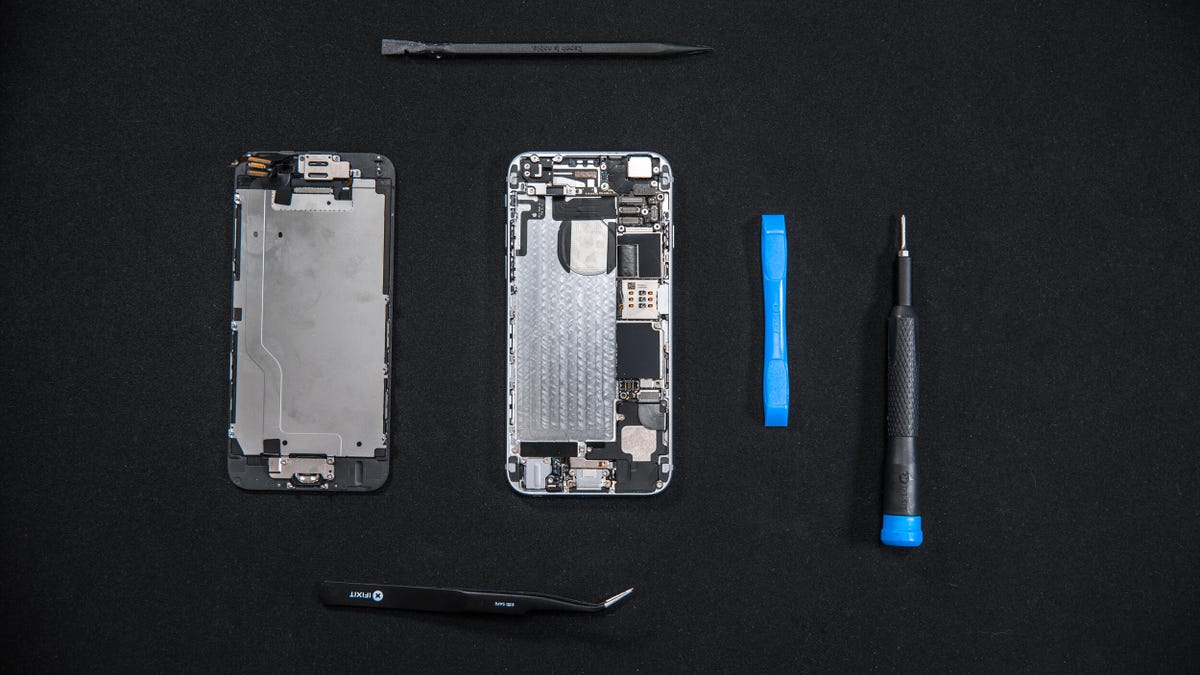
To replace your iPhone battery at home, you need the right tools. Using improper tools can damage your phone, making the repair process much harder than it needs to be.
Essential Tools for Replacing Your iPhone Battery
Here’s a list of essential tools you’ll need:
-
Pentalobe screwdriver: To open the screws on your iPhone.
-
Plastic Pry Tools: To safely open your phone without damaging the screen.
-
Suction Cup Tool: To lift the screen without damaging it.
-
Tweezers: For handling small parts.
-
New iPhone battery: Make sure to purchase a high-quality replacement.
Where to Find the Best iPhone Replacement Parts
You can find replacement iPhone batteries and tools from several reliable sources:
-
iFixit: Known for their high-quality parts and detailed guides.
-
Amazon: Offers a wide range of parts but be sure to check reviews before purchasing.
Step-by-Step Guide to Replacing Your iPhone Battery
Now that you have everything you need, it’s time to dive into the step-by-step process. Follow these instructions carefully, and you’ll be on your way to having a refreshed iPhone in no time.
Step 1: Preparing Your iPhone and Workspace
Before starting, make sure you’re working in a clean, well-lit area. Gather all the necessary tools and ensure your phone is turned off. It’s a good idea to back up your data in case something goes wrong during the replacement process.
Step 2: Opening Your iPhone Safely
Start by removing the screws from the bottom of your iPhone using the pentalobe screwdriver. After the screws are removed, use a suction cup tool to gently lift the screen. Be patient during this step, as forcing the screen can crack it.
Using the Right Tools to Avoid Damage
If you’re not using plastic pry tools or a suction cup, you risk damaging the screen or other components. Ensure you’re using tools specifically designed for this purpose.
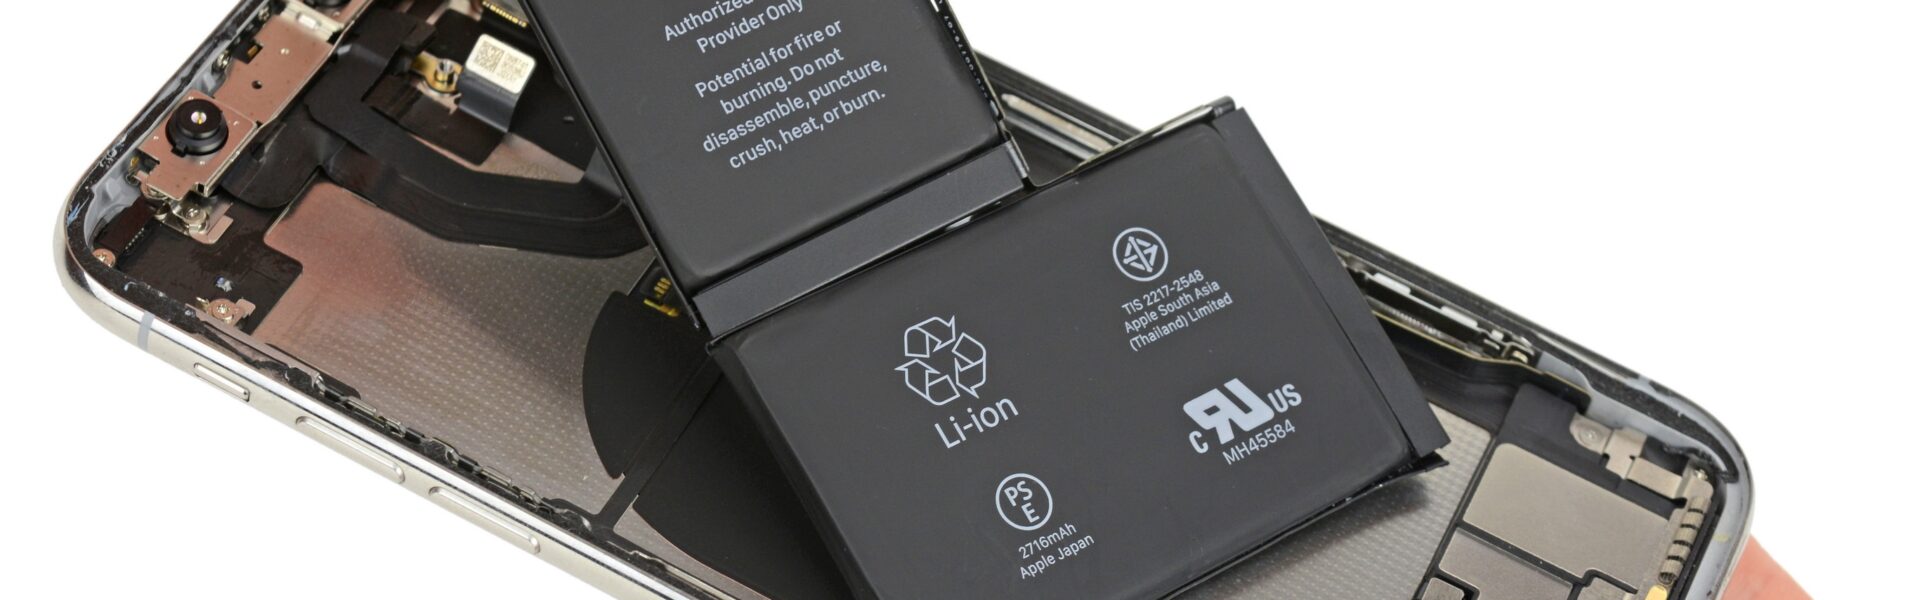
Step 3: Disconnecting the Battery and Removing It
Once you’ve opened the iPhone, locate the battery and disconnect it from the motherboard. You’ll need to remove any screws that are holding the battery in place. Gently lift the battery out.
Step 4: Installing the New Battery
Place your new battery in the phone and reconnect it to the motherboard. Make sure the connections are secure before moving on to the next step.
Ensuring Proper Connection and Placement
Ensure the battery is placed correctly and that no wires are pinched. A loose battery connection can lead to performance issues.
Step 5: Reassembling Your iPhone
Once the new battery is securely in place, carefully reassemble your iPhone. Screw everything back into place, making sure the screen is aligned correctly.
Tips for Ensuring Your Battery Replacement Goes Smoothly
Replacing your iPhone battery might seem like a daunting task, but with a few tips, you can make the process go much more smoothly.
- Handling Your iPhone With Care During the Process
Be gentle when handling your iPhone. Avoid putting too much pressure on the screen or components to prevent damage.
- Troubleshooting Common Issues After Replacement
If your iPhone isn’t turning on after the replacement, check the connections again to ensure everything is secure. Also, try a soft reset.
Replacing your iPhone battery at home can save you money and extend the life of your device. However, it’s not for everyone. If you feel comfortable with DIY repairs, this guide should help you navigate the process. Just remember to be patient, use the right tools, and always back up your data. If you’re unsure about handling the repair yourself, professional help is always an option.
Read Also: Unlock Your Disabled iPhone: 5 Simple Steps to Fix It
Frequently Asked Questions (FAQs)
1. How can I tell if my iPhone battery needs replacing?
You can check your battery health by going to Settings > Battery > Battery Health. If the maximum capacity is under 80%, it’s time for a replacement.
2. What tools do I need to replace my iPhone battery?
You will need a pentalobe screwdriver, suction cup tool, plastic pry tools, tweezers, and a new replacement battery.
3. Is replacing the iPhone battery at home safe?
Yes, if you follow the proper steps and use the right tools, it’s safe. However, if you’re not confident in your skills, it’s better to seek professional help.
4. Can I void my iPhone warranty by replacing the battery myself?
Yes, replacing the battery yourself can void your warranty. If your iPhone is under warranty, you might want to consider visiting an Apple store instead.
5. How much does it cost to replace an iPhone battery at home?
The cost of replacing your iPhone battery at home depends on the cost of the replacement battery and tools. On average, a replacement battery costs between ₦10,000 to ₦25,000 (Nigerian Naira), while tools may range from ₦15,000 to ₦20,000, depending on the quality and source of purchase.